
背景
当提供同一服务的节点群拥有同一个配置文件,当配置文件需要修改的时候,必须修改配置文件后重新部署然后重启服务。
显然这是一个重复的过程,而编程就应该避免这样重复的事情。
springcloud config的出现就是为了解决这个问题。它能统一管理所有的配置,如果需要更改配置,只需要更改配置中心即可,不需要变更已经部署好的服务。并且应该支持配置刷新而不重启服务。如果配置错误还能回滚到上一个配置。
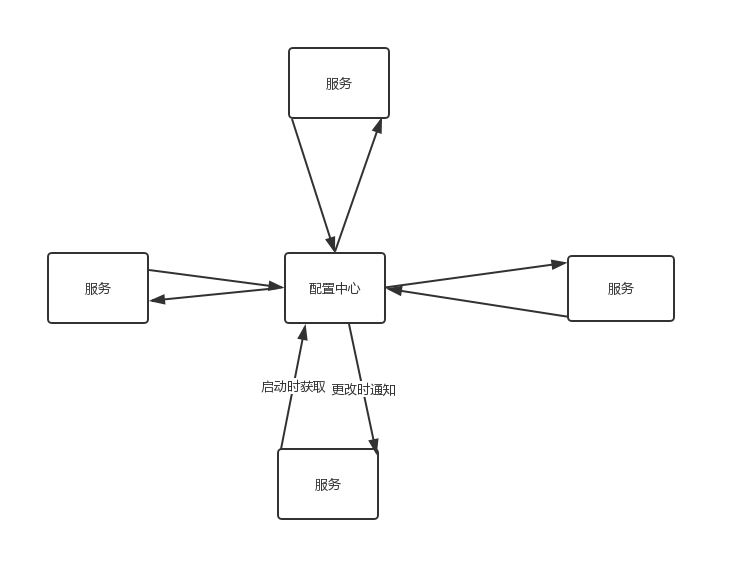
配置中心,既然是一个中心,那么它肯定和每一个节点都有交集,这样节点才能从其中获取配置信息。其实配置中心就像注册中心一样,不过作用不同,比如任意一个所有节点都可以访问到的数据载体都可以作为配置中心。比如git仓库,本地文件,数据库等。
单机config
先介绍springcloud原生的配置中心。这里使用mysql数据库作为例子。
依赖
1 | <parent> |
配置文件
application.yml1
2
3
4
5
6
7
8
9
10
11
12
13
14
15
16
17
18
19
20spring:
profiles:
#这里是数据库,所以是jdbc
active: jdbc
application:
name: config-jdbc-server
# datasource的配置
datasource:
url: jdbc:mysql://127.0.0.1:3306/config_jdbc?useUnicode=true&characterEncoding=utf8&characterSetResults=utf8&serverTimezone=GMT%2B8
username: ****
password: ****
cloud:
config:
label: master
server:
jdbc:
# sql语句,这会查询出一系列的数据,其中的key,value就对应这配置文件中的行
sql: select my_key,my_value from properties where application=? and profile=? and label=?
server:
port: 8770
myslq数据库
数据都存储在mysql数据库中,因此还差一个数据库。
创建数据库,并插入数据1
2
3
4
5
6
7
8
9
10
11
12
13
14CREATE DATABASE IF NOT EXISTS `config_jdbc`;
USE `config_jdbc`;
DROP TABLE IF EXISTS `properties`;
CREATE TABLE `properties` (
`pk` int(11) NOT NULL AUTO_INCREMENT,
`my_key` varchar(45) NOT NULL,
`my_value` varchar(45) NOT NULL,
`application` varchar(45) NOT NULL,
`profile` varchar(45) NOT NULL,
`label` varchar(45) NOT NULL,
PRIMARY KEY (`pk`),
UNIQUE KEY `pk_UNIQUE` (`pk`)
) ENGINE=InnoDB AUTO_INCREMENT=3 DEFAULT CHARSET=utf8;
INSERT INTO `properties` VALUES (1,'server.port','8989','config-client','dev','master'),(2,'foo','hello','config-client','dev','master');
启动类
1 |
|
测试
新建一个工程
依赖
1 | <parent> |
配置文件
bootstrap.yml:
注意是bootstrap,因为bootstrap.yml会比application.yml先加载。1
2
3
4
5
6
7
8
9
10
11
12
13
14
15
16
17
18
19
20
21spring:
application:
name: config-client
cloud:
config:
#config-server的地址
uri: http://localhost:8770
#读取配置失败后,执行快速失败。
fail-fast: true
#spring读取配置文件的环境,mysql中profile对应为dev的配置项
profiles:
active: dev
# 暴露一些可供访问端口,否则无法刷新
management:
endpoints:
web:
exposure:
include: "*"
endpoint:
health:
show-details: ALWAYS
启动类
1 |
|
测试
- 这里使用到consul了注册中心,因此先启动注册中心
consul agent -dev - 启动config server
- 启动config client
- 在浏览器中输入[http://localhost:8989],可以观察到`hello 8989`,恭喜你成功了。
- 修改mysql数据库中foo为hello world
- 使用post请求
http://localhost:8989/actuator/refresh,你可以在shell中使用curl -X POST localhost:8989/actuator/refresh - 重新刷新浏览器页面,你会看到
hello world 8989,恭喜你成功了
注意事项
- 如果不引入actuator包,不暴露refresh的端口,是无法刷新的
- client中使用了没有在数据库中的配置,也没在配置文件中配置,会失败
这里依赖了注册中心,因此注册中心会先启动,如果将注册中心的配置写到mysql中,这些配置会失效,因为注册中心此时已经启动结束了。
流程
mysql存储了配置数据
- config server启动连接了数据库
- config client启动链接了config server,执行了一条sql语句
select my_key,my_value from properties where application=? and profile=? and label=?,其中application为该服务的名字,profile和label也是数据库用来筛选哪一个配置文件的。 - server获取到一个列表,也就是k/v,比如你想将端口配置为8989,那么结果就是
id=xxx,my_key=server,my_value=8989,applidation=xxx,profile=xxx,label=xxx,server将数据发送给client,client启动。 - 刷新的时候,post请求会使得client想config server再次请求数据,因此可以刷新。
集群config
为了保证配置中心的高可用,有必要将其配置为集群。
原理很简单,将很多相同名字的config server 注册到注册中心,把它当做一个普通的服务,让其他的服务来注册中心选择多个配置中心中的一个config server即可。
- 将config server工程部署到三台机器或者使用docker模拟三台机器也行。
- 修改client配置文件
1 | spring: |
完成。
问题
- mysql数据库集群的同步怎么做
- 刷新时需要每一个client 请求一个post,是否太麻烦,虽然可以使用脚本
- 可以使用spring cloud bus + 消息中间件来配置自动刷新,可是太麻烦
解决办法
使用Alibaba的配置中心组件nacos。